

GitHub 101: The Essentials- Pull, Branch, Commit, Push!
Beginners Procedural Approach

Building Enterprise Softwares🚀 | Sharing insights on Linkedin/in/Waleed-javed
As a Full stack Developer GitHub is mostly the resting ground after a whole work-hefty day (or week -Depending on your company policy)!
Git Plays a vital role in our daily life as a software developer, regardless of your role, And pretty much every now and then, you come across the GIT ! GIT ! GIT ! -phase 😐 (Should we call it G3🤨 Sounds fancy 😁)
Fancy Terms
I like to call this as GCPP cycle of a developer's life. 😉
Now you will be wondering what this GCPP stands for? (any Guess?)
Well it's simple! Git Commit... Push... Pull... -phase😅. So in order to better understand how should one go through GCPP! phase Now we will see the basics of working with Git.
The Ultimate Sufferings
HOW TO EVEN DO THIS!! 😶😥
If you're like me you probably have suffered understanding:
- Committing Code
- Make Branches
- Shifting in-between different Branches
- What the hell is Local branches and Remote branches
- Git Hashes
- Saving your Code to your Local System/Laptop
- Saving it on the sErVeR🥴 (GitHub Remote Repo)
- Pulling back code from the Remote Repo present on the Github Server's
- And again Committing back to the repo!
Doctor Dev to the Rescue
Lets start by understanding what is GIT anyway!
So as per Google's definition:
Git is software for tracking changes in any set of files, usually used for coordinating work among programmers collaboratively developing source code during software development. Its goals include speed, data integrity, and support for distributed, non-linear workflows.
Me? well, I say,
Git is just another Software that helps in keeping record of changes in your files and data by use of simple yet effective techniques such as hashing!
Show me the Code!
Before moving to the code we need to understand what are the different terminologies associated with Git!
I will define in following order:
=> Term => Definition and Usage => Syntax/Command in terminal
Let's Start From Base:
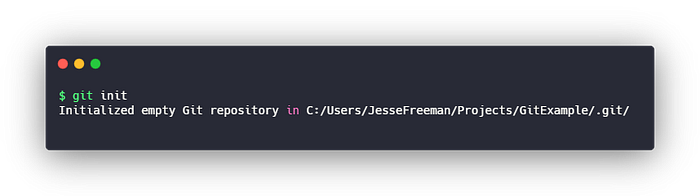
Git Init:
- => Before starting any project what every wise programmer does is, Initialize a git repo on their local system (in layman terms, Making a git init call via their terminal in the current repo/Folder in which the work will be continued)
- => git init
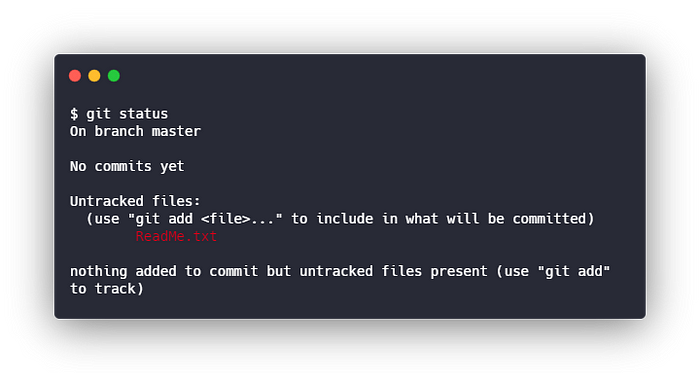
Git Status:
- => As per the name, Git Status is also a terminal command aimed to show the status of different files in the system/project, It highlights: which of the files have changed since you last checked the code status, which are being tracked and which are not part of the tracking process.
- => git status
Git Add:
- => So, we saw how Git init and Git status is used for making and checking status of our project, now let's say that the file you wanted to work on is not included in tracking by git, so how would you track that!
What? but how? Everything was perfect and followed properly! now what?
- Here come's the role of Git Add, Now there is one catch to this, and that is, the add command has some parameters just like all other git commands, so let's say you added 10 new files and items in the project, which could be anything, for example, let's say you added 5 images and 3 icons and 2 new code files were created, now all these are not tracked (for any reason) by git.
- In such situation, Git Add, allows us to add all the files to tracking in one go! but how? (see the syntax section)
- => git add .
(Note: the dot at the end, that is a wildcard which allows us to add all files to tracking in one-go, now if you want to add a specific file only, you can add by writing the name instead)
- => So, we saw how Git init and Git status is used for making and checking status of our project, now let's say that the file you wanted to work on is not included in tracking by git, so how would you track that!
Git Pull:
- => Whenever you want to access someone's code or wish to work on some project, you go to (Github.com) and download the project files, what can rather be done is that, you use the Git Pull command from the CLI (command Line Interface also referenced as Terminal) and directly get the code in your code editor! (Amazing Right!) Now Don't think git pull is just for this purpose!
- Git Pull is also used when you wish to integrate other person's work and make your code base up to date, suppose someone made changes in the file which you were working on, now those changes won't be reflected in your file direclty, so what you need to do is PULL. so when you pull the changes what happens is, the new code base is reflected in your current working directory...
- => git pull Branch-URL-HERE
Moving Up To Branches!!
Now, before moving forward and learning how to commit your code to git, we first need to understand what are branches on a very much basic level.
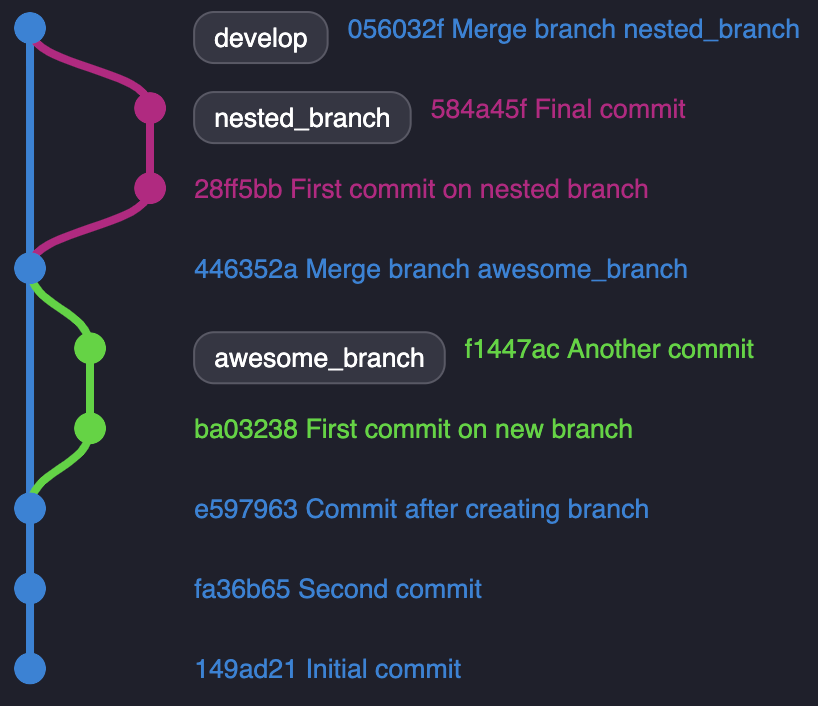
Branches are the most critical and confusing part of the Git system!

What are branches?
The Git system is based on branches, yes, just like a tree. The tree's have base and branches, similarly, When you're working on multiple aspects in a project, each aspect can be considered as a separate branch, for example, if a person is making a progressive web app, or a mobile app, the overall architecture can be divided into multiple segments, for example we consider the front-end and back-end as two different branches and then if you have a mobile app accompanying your web app then you have three branches to work with!
How many branches can we have!
Technically, unlimited!
Now these 3 branches we talked about can further be sub-divided into multiple aspects where each aspect will act as a (logical) branch and this can be even up to the level where each person associated with the project will basically be a separate sub-branch in it's own working (virtually).
Does that mean we should keep on making branches!
Definitely NOT!!, The More ,The Messier
Even though you can make as much as you want, but that is bad practice, As the no. of branches increases, it becomes more and more difficult to maintain each one!
Yes you can neglect them once they are done, but the tree will be super messy for new dev's to start, as they won't know which branch is neglected and which one's are still in use!! (see, even a more bigger mess to deal with)
So what should be done?
There are multiple conventions for that purpose and certainly even great ones that are adopted in many billion dollar companies, but for now we will only see a fairly simple convention, as depicted in the below figure!

Master Branch
Master branch, As per the name, the branch is the main one (Boss 😉) which consist of only bug-free code and is responsible for consisting of whole application code, and in case there arises any issue in this branch, it a red flag for the whole system! so Never commit your code directly to this branch.
Feature Branch
Feature branch is responsible for holding the code for multiple new features that are being added into the system. This is conventionally, where the new features are added as soon as they are developed and tested.
Hot Fix Branch
Hot Fixes is the branch responsible for applying any sort of patches to the system.
Release Branch
Release branch as the code which is to be deployed in the upcoming update of the system.
Develop Branch
Develop branch is the main working branch where all the dev's usually commit their code once they are done solving their respective tasks and issue's related to the project.
Test Branch
This is the branch where the above code is passed, basically this branch is used by the Q/A and testing teams, for testing the code for possible flaws and bugs that need revisions by the developers.
Deploy
This branch is often used as an alternative for deployment of the software rather than Main/Master branch and it is a good practice to have a deployment branch.
Note: There can be multiple branches for same objective, but each branch should be unique.
Now We're Ready to Roll !! 😎
But wait!! How do I create a branch?
A branch can be created in multiple ways using the git commands, we'll see that in a bit. Beforehand, we should know something more about the branches!
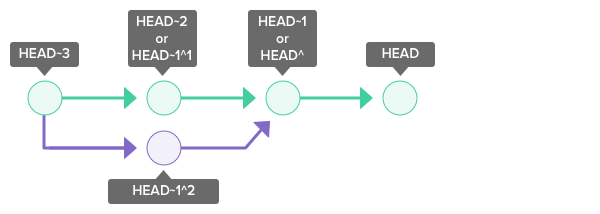
Each branch in Git has a specific nodes that point towards them, also referred as HEAD of the branch/node
Now we're ready to make branches
Making A New Branch:
Branches keep things clean for both the developers and testers.
A good practice and rule of thumb is to make new branches for each day's work or changes that are to be committed every time you commit to git.
=> git checkout -b BRANCH-NAME
NOTE: This will make a new branch with the name provided and you will be moved to that new branch as Current/Active/Working branch.
For keeping Things Organized a good convention is to add Prefix to your branch depending on the segment you're working on. for example:
git checkout -b Web/Unique-BRANCH-NAME
git checkout -b Web/FrontEnd/Unique-BRANCH-NAME
git checkout -b Server/Unique-BRANCH-NAME
git checkout -b Mobile/Unique-BRANCH-NAME
Stay Committed 😉
Commitment and consistency is the key. Committing changes made in your code to git-hub is definitely the best part of a developer's life (as long as no bugs are reflected😂)
-=> git commit -m "Add a message so you know what you did."
Note: this commit will save the code in the current working branch -Locally.
Time to Push Away!
The code you saved after committing is saved on your local machine. which means, if in case your system goes in some trouble, everything is lost! so what we need is to push the code to GitHub servers
-=> git push --set-upstream origin Active_Branch_Name_You_Working_on_HERE
Shortcut (Who Doesn't like shortcuts 😛)
- => git push -u origin Active_Branch_Name_You_Working_on_HERE
NOTE: This will push the code to git-hub as new branch (with the branch name you provided at time of creation of branch)
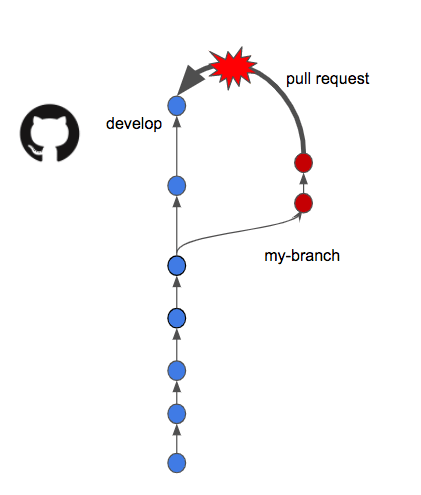
Merge 🤝
Open Git hub and create a pull request from the branch you committed your code to the branch you want to merge with. This can be done via git CLI as well, but that is left for the upcoming blog!😉
Finally, it’s important to note that Git struggles to store large binary files which is another reason to use a .gitignore file. A lot of your training data like image, videos, or anything over 50 megs could cause an issue. GitHub has a hard limit on large file sizes, and if you accidentally commit one, it will take a few additional steps to undo the changes, especially if you are new to Git or the command line. It’s best to back up those files in a different version control system.
HAPPY HACKING! 💻🔬🧪
Leave a comment if you like it! and visit (waleedjaved.com) and (chaudhary.codes) for more!


